
ENGR 1330 Computational Thinking with Data Science
Copyright © 2021 Theodore G. Cleveland and Farhang Forghanparast
Last GitHub Commit Date: 4 Jan 22
3: Data Types and Typecasting
integer
float
string
boolean
String functions and operations
How to Build a Notebook (Another look at problem solving)
Data Type
In the computer data are all binary digits (actually 0 and +5 volts). At a higher level of abstraction data are typed into integers, real, or alphanumeric representation. The type affects the kind of arithmetic operations that are allowed (as well as the kind of arithmetic - integer versus real arithmetic; lexicographical ordering of alphanumeric , etc.) In scientific programming, a common (and really difficult to detect) source of slight inaccuracies (that tend to snowball as the program runs) is mixed mode arithmetic required because two numeric values are of different types (integer and real).
Learn more from the textbook
https://www.inferentialthinking.com/chapters/04/Data_Types.html
Here we present a quick summary
Integer
Integers are numbers without any fractional portion (nothing after the decimal point { which is not used in integers). Numbers like -3, -2, -1, 0, 1, 2, 200 are integers. A number like 1.1 is not an integer, and 1.0 is also not an integer (the presence of the decimal point makes the number a real).
To declare an integer in Python, just assign the variable name to an integer for example
MyPhoneNumber = 14158576309
Real (Float)
A real or float is a number that has (or can have) a fractional portion - the number has decimal parts. The numbers 3.14159, -0.001, 11.11, 1., are all floats. The last one is especially tricky, if you don’t notice the decimal point you might think it is an integer but the inclusion of the decimal point in Python tells the program that the value is to be treated as a float. To declare a float in Python, just assign the variable name to a float for example
MyMassInKilos = 74.8427
String(Alphanumeric)
A string is a data type that is treated as text elements. The usual letters are strings, but numbers can be included. The numbers in a string are simply characters and cannot be directly used in arithmetic. There are some kinds of arithmetic that can be performed on strings but generally we process string variables to capture the text nature of their contents. To declare a string in Python, just assign the variable name to a string value - the trick is the value is enclosed in quotes. The quotes are delimiters that tell the program that the characters between the quotes are characters and are to be treated as literal representation.
For example
MyName = 'Theodore'
MyCatName = "Dusty"
DustyMassInKilos = "7.48427"
are all string variables.
The last assignment is made a string on purpose.
String variables can be combined using an operation called concatenation.
The symbol for concatenation is the plus symbol +.
Strings can also be converted to all upper case using the upper() function. The syntax for
the upper() function is 'string to be upper case'.upper().
Notice the “dot” in the syntax.
The operation passes everything to the left of the dot to the function which then
operates on that content and returns the result all upper case (or an error if the input stream
is not a string).
# Variable Types Example
MyPhoneNumber = 14158576309
MyMassInKilos = 74.8427
MyName = 'Theodore'
MyCatName = "Dusty"
DustyMassInKilos = "7.48427"
print("All about me")
print("Name: ",MyName, " Mass :",MyMassInKilos,"Kg" )
print('Phone : ',MyPhoneNumber)
print('My cat\'s name :', MyCatName)  # the \ escape character is used to get the ' into the literal
print("All about concatenation!")
print("A Silly String : ",MyCatName+MyName+DustyMassInKilos)
print("A SILLY STRING :  ", (MyCatName+MyName+DustyMassInKilos).upper())
All about me
Name:  Theodore  Mass : 74.8427 Kg
Phone :  14158576309
My cat's name : Dusty
All about concatenation!
A Silly String :  DustyTheodore7.48427
A SILLY STRING :   DUSTYTHEODORE7.48427
Strings can be formatted using the % operator or the format() function. The concepts will
be introduced later on as needed in the workbook, you can Google search for examples of
how to do such formatting.
Boolean (Logical)
Python boolean type is one of the built-in data types provided by Python, which represents one of the two values i.e. True or False. Generally, it is used to represent the truth values of the expressions. The boolean value can be of two types only i.e. either True or False. The output <class ‘bool’> indicates the variable is a boolean data type.
1 == 1
True
2 < 1
False
type(1 == 1)
bool
Somewhat less confusing is to assign values to a variable
xx = True
print(type(xx),xx) # type function and value of variable
<class 'bool'> True
# Python program to illustrate
# built-in method bool()

# Returns False as x is not equal to y
x = 5
y = 10
print(bool(x==y))

# Returns False as x is None
x = None
print(bool(x))

# Returns False as x is an empty sequence
x = ()
print(bool(x))

# Returns False as x is an empty mapping
x = {}
print(bool(x))

# Returns False as x is 0
x = 0.0
print(bool(x))

# Returns True as x is a non empty string
x = 'KittyKat'
print(bool(x))
False
False
False
False
False
True
Numbers can be used as bool values by using Python’s built-in bool() method. Any integer, floating-point number, or complex number having zero as a value is considered as False, while if they are having value as any positive or negative number then it is considered as True.
Boolean Operations are simple arithmetic of True and False values. These values can be manipulated by the use of boolean operators which include AND, OR, and NOT. Common boolean operations are
or
and
not
== (equivalent)
!= (not equivalent)
Boolean are used extensively for program flow control.
Changing Types
A variable type can be changed.
This activity is called type casting.
Three functions allow
type casting: int(), float(), and str().
The function names indicate the result of using
the function, hence int() returns an integer, float() returns a
float, and str() returns a
string.
There is also the useful function type() which returns the type of variable. Some things cannot be re-typed, for example the string “123IamAcat” has no integer representation, although the first 3 characters are integer.
s = "123IamAcat"
print(type(s))
# s = int(s) # this will generate an error, activate and see for yourself
# print(type(s))
s = int(s[0:2]) #but we can extract characters that are numeric - called slicing the string
print(type(s))
<class 'str'>
<class 'int'>
Some more examples:
# Type Casting Examples
MyInteger = 234
MyFloat = 876.543
MyString = 'What is your name?'
print(MyInteger,MyFloat,MyString)
print('Integer as float',float(MyInteger))
print(' as integer',int(MyInteger))
print('Integer as string',str(MyInteger))
print('Integer as hexadecimal',hex(MyInteger))
print('Integer Type',type((MyInteger)))  # insert the hex conversion and see what happens!
234 876.543 What is your name?
Integer as float 234.0
 as integer 234
Integer as string 234
Integer as hexadecimal 0xea
Integer Type <class 'int'>
How to Build a Program/Notebook
Recall our suggested problem solving protocol:
Explicitly state the problem
State the input information, governing equations or principles, and the required output information.
Work a sample problem by-hand for testing the general solution.
Develop a general solution method (coding).
Test the general solution against the by-hand example, then apply to the real problem.
Refine general solution for deployment (frequent use)
The protocol below is shamelessly lifted from http://users.csc.calpoly.edu/~jdalbey/101/Lectures/HowToBuildAProgram.html here we are using the concept of program and notebook as the same thing.
Building a program is not an art, it is an engineering process. As such there is a process to follow with clearly defined steps.
Analysis (Understand the Requirements)
In this class you will usually be given the problem requirements, unlike the real-world where you have to elicit the requirements from a customer. For you the first step will be to read the problem and be sure you understand what the program must do. Summarize your understanding by writing the Input data, Output data, and Functions (operations or transformation on the data). In the context of our (WCOE) protocol this step comprises Steps 1 and 2.
Create a Test Plan
You must be able to verify that your program works correctly once it is written. Invent some actual input data values and manually compute the expected result. In the context of our (WCOE) protocol this step comprises Steps 3.
Invent a Solution
This is the creative, exploratory part of design where you figure out how to solve the problem. Here is one strategy:
Solve the problem manually, the way you would do it as a human. Pay careful to attention what operations you perform and write down each step.
Look for a pattern in the steps you performed.
Determine how this pattern could be automated using the 3 algorithm building blocks (which we learn about a few lectures from now) (Sequence, Selection, Iteration).
Design (Formalize your solution)
Arrange your solution into components; this is called the architecture. Write the algorithm for each component. Refine your algorithm in a step-wise manner if necessary. Determine the data types and constraints for each data item. Review
Perform a hand trace of your solution and simulate how the computer will carry out your algorithm. Make sure your algorithm works correctly before you put it into the computer.
Implementation (coding)
Translate your algorithm into a programming language and enter it into the computer.
Compile your source code to produce an executable program.
You may want to compile and test each subprogram individually before combining them into a complete program.
Testing
Execute the program using the Test Plans you created above. Correct any errors as necessary.
Example of Problem Solving Process
Consider an engineering material problem.
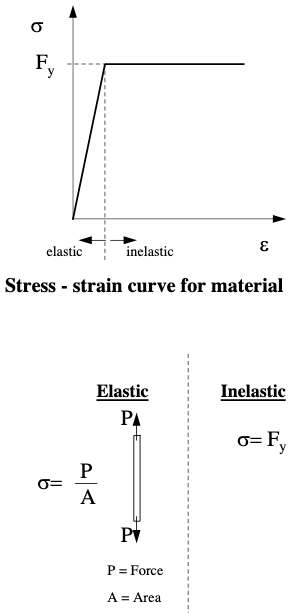
Fig. 3 Schematic of slender rod deformation under an applied load
Fig. 3 is a schematic of a situation where we wish to classify whether a material is loaded in the elastic or inelastic region as determined the stress (solid pressure) in a rod for some applied load. The yield stress is the classifier, and once the material yields (begins to fail) it will not carry any additional load (until ultimate failure, when it carries no load).
Following our problem solving protocol:
Step 1. Compute the material stress under an applied load; determine if value exceedes yield stress, and report the loading condition
Step 2.
Inputs: applied load, cross sectional area, yield stress
Governing equation: \(\sigma = \frac{P}{A}\) when \(\frac{P}{A}\) is less than the yield stress, and is equal to the yield stress otherwise.
Outputs: The material stress \(\sigma\), and the classification elastic or inelastic.
Step 3. Work a sample problem by-hand for testing the general solution.
Assuming the yield stress is 1 million psi (units matter in an actual problem - kind of glossed over here)
Applied Load (lbf) |
Cross Section Area (sq.in.) |
Stress (psi) |
Classification |
|---|---|---|---|
10,000 |
1.0 |
10,000 |
Elastic |
10,000 |
0.1 |
100,000 |
Elastic |
100,000 |
0.1 |
1,000,000 |
Inelastic |
The stress requires us to read in the load value, read in the cross sectional area, divide the load by the area, and compare the result to the yield stress. If it exceeds the yield stress, then the actual stress is the yield stress, and the loading is inelastic, otherwise elastic
Step 4. Develop a general solution (code)
Fig. 4 is a flow-chart for this problem.
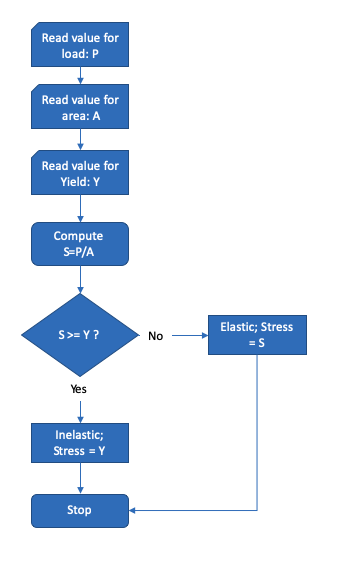
Fig. 4 Flowchart for load classification
An alternative would be some kind of psuedocode for the problem.
Step 5. This step we would code the algorithm expressed in the figure and test it with the by-hand data and other small datasets until we are convinced it works correctly. We have not yet learned prompts to get input we simply direct assign values as below (and the conditional execution is the subject of a later lesson)
In a simple JupyterLab script
# Example 2 Problem Solving Process
yield_stress = 1e6
applied_load = 1e5
cross_section = 0.1
computed_stress = applied_load/cross_section
if(computed_stress < yield_stress):
    print("Elastic Region: Stress = ",computed_stress)
elif(computed_stress >= yield_stress):
    print("Inelastic Region: Stress = ",yield_stress)
Inelastic Region: Stress = 1000000.0
Step 6. This step we would refine the code to generalize the algorithm. In the example we want a way to supply the inputs by user entry,and tidy the output by rounding to only two decimal places. A little CCMR from https://www.geeksforgeeks.org/taking-input-in-python/ gives us a way to deal with the inputs and typecasting. Some more CCMR from https://www.programiz.com/python-programming/methods/built-in/round gets us rounded out!
Note
The code cell below contains interactive components, which will not compile into the Jupyter Book, so they are left for the reader to cut-and-paste. We will demonstrate in class how these work.
# Example 2 Problem Solving Process
yield_stress = float(input('Yield Stress (psi)'))
applied_load = float(input('Applied Load (lbf)'))
cross_section = float(input('Cross Section Area (sq.in.)'))
computed_stress = applied_load/cross_section
if(computed_stress < yield_stress):
    print("Elastic Region: Stress = ",round(computed_stress,2))
elif(computed_stress >= yield_stress):
    print("Inelastic Region: Stress = ",round(yield_stress,2))
So the simple task of computing the stress, is a bit more complex when decomposed, that it first appears, but illustrates a five step process (with a refinement step), and we have done our first classification problem, albeit a very simple case!
References
Computational and Inferential Thinking Ani Adhikari and John DeNero, Computational and Inferential Thinking, The Foundations of Data Science, Creative Commons Attribution-NonCommercial-NoDerivatives 4.0 International (CC BY-NC-ND) Chapter 4 https://www.inferentialthinking.com/chapters/04/Data_Types.html
Learn Python in One Day and Learn It Well. Python for Beginners with Hands-on Project. (Learn Coding Fast with Hands-On Project Book – Kindle Edition by LCF Publishing (Author), Jamie Chan https://www.amazon.com/Python-2nd-Beginners-Hands-Project-ebook/dp/B071Z2Q6TQ/ref=sr_1_3?dchild=1&keywords=learn+python+in+a+day&qid=1611108340&sr=8-3
—
Laboratory 3
Examine (click) Laboratory 3 as a webpage at Laboratory 3.html
Download (right-click, save target as …) Laboratory 3 as a jupyterlab notebook from Laboratory 3.ipynb
Exercise Set 3
Examine (click) Exercise Set 3 as a webpage at Exercise 3.html
Download (right-click, save target as …) Exercise Set 3 as a jupyterlab notebook at Exercise Set 3.ipynb